

Calculated Fields Form is the best WordPress calculator plugin based on several factors.
I will share my reasons with you in this post and at the end of it you will as well let me know if you agree with me or not.
First, I will like to clearly state that every information or opinion I am going to present to you is based on my experience. ALL the calculators on this site are created with Calculated Fields Form. I have used virtually every WordPress Calculator that is available on the WordPress plugin repository. So I have a first-hand experience of all of them. I have used Caldera forms, EZ forms, Cost Calculator by Boldthemes, Caldera forms and even Contact Form 7 (yes it can be used for calculations), Formidable Forms, Gravity Form.
Before
When considering a WordPress Calculator plugin there are some major factors you should consider. These factors include:
1. Versatility of calculation
Calculated Fields Form has more mathematical operations than most of the other calculator plugins, even in its free version. Its operators range from simple arithmetic addition, subtraction, multiplication, division to log, sin, cosine, tan, floor, radian, concatenate and even more. You can read about all the operators here. There are a few operations that are found only in the Developer and platinum versions. These include financial calculations like ‘CALCULATEPAYMENT(x,y,z)’that is t used to calculate the Financed Payment Amount, CALCULATEAMOUNT(x,y,z), CALCULATEMONTHS(x,y,z), CALCULATEINTEREST(x,y,z), CALCULATEAMOUNT(x,y,z), CALCULATEACCRUEDINTEREST(x,y,z) and most important;y CALCULATEAMORTIZATION(x,y,z,date). This last operator is one of the most complicated calculations in mathematics. The developer version of this plugin makes it very easy for you to run such calculator and even create an amortization table without understanding any programming language.
You might not need to carry out some advance calculations, no matter what your needs are Calculated Fields Form can satisfy it. This calculator also supports any form of conditional logic that is achievable in javascript or jquery. Let me give you some examples so you can understand what I mean clearer.
Example 1:
You have a calculator like this one, with a slider ranging from 0 – 30 (years). You can define different loan interest rates for each year such that between years 0 – 10, the interest rate will be 5% and between 11 – 15 years the interest rate will be 10% and so on. The formula will be something like this:
(function(){
if(fieldname34>0&&fieldname34<=10) return 5/100;
if(fieldname34>10) return 10/100;


})()
where fieldname34 is the slider.
Example 2
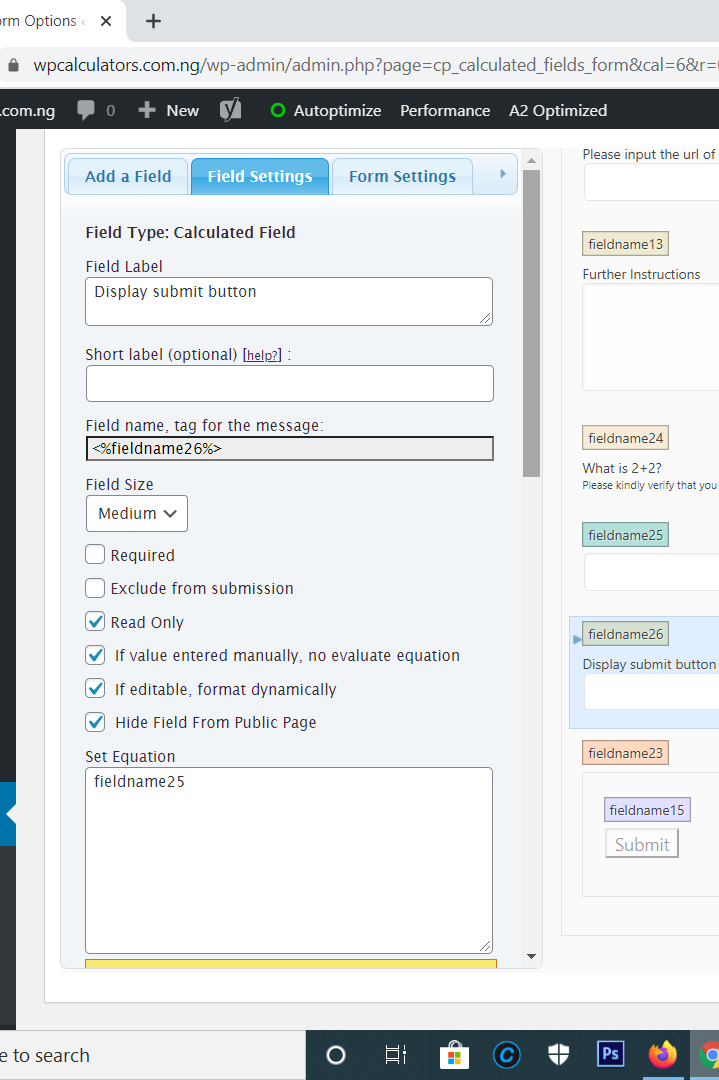
You can create dependable fields. For instance, in the contact form I used on this site for sending a message, the submit button does not show until the correct answer to the question asked is inputted with a slider. So that is my own tactic of avoiding spam messages. Note that data submission is available in the professional, developer and platinum versions of the plugin. So to achieve hiding the submit button till the write answer is supplied, this is what I did.
- I created a slider with the range ‘1-3’ whose name is fieldname25
- I created a calculated field and in the formula, I simply wrote ‘fieldname25’, so this field is supposed to display whatever number is inputted with the slider.
- I go to the settings of the calculated field and under ‘if value is’ I typed in ‘4’.
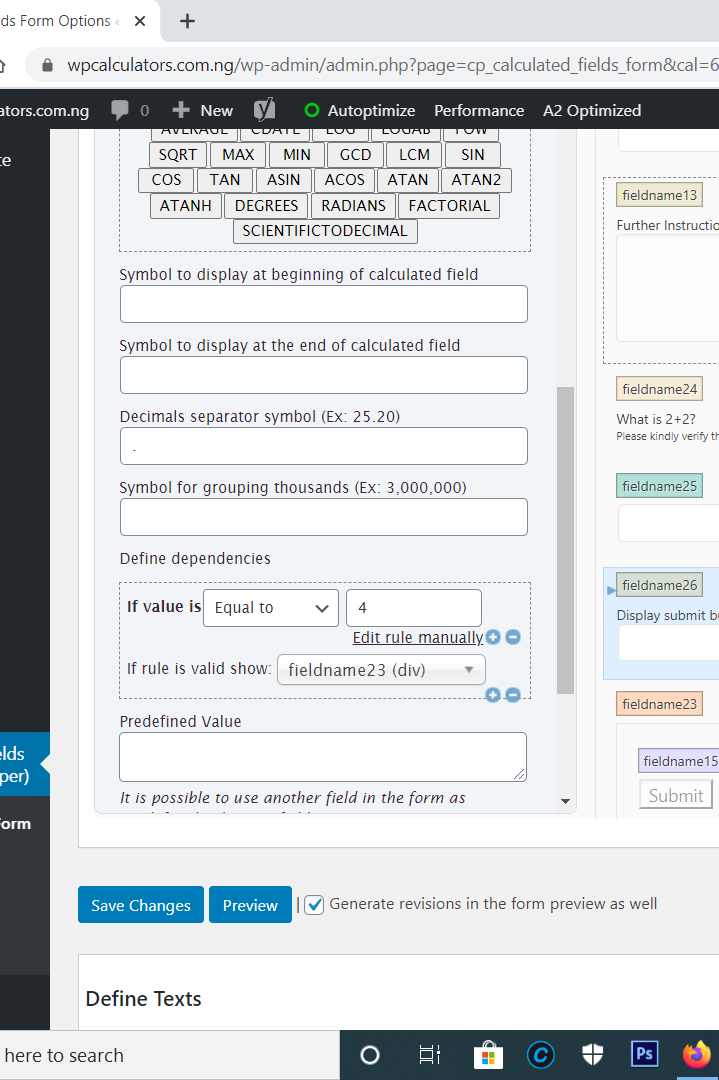
5. Then under ‘If rule is valid show’ I selected ‘fieldname23’ which is the name for the submit button.
6. Lastly, hide the calculated field from the public page.
The fieldnames in calculated fields form are automatically generated. So the first field you create will be fieldname1, the second will be fieldname2 and it goes on like that.
For more information about the conditional logic operations in calculated fields forms, see this. All the conditional logic operations are available in the free version of the plugin. You could even hide multiple fields until a particular radio button is checked as I have done in this marriage compatibility calculator. If ‘man’ is selected all the fields change, if ‘woman’, the same thing happens. So you could have a conditional logic in three ways:
- by manually writing a formula
- by using the setting of a calculated field
- by using the dependency of a radio button (See example below)
Interestingly, you can have more than one fields depending on a button.
Another operation you can carry out with the conditional logic is to check if a number is an integer. You can use the FLOOR operator to achieve that. Let’s have an equation where we would say if fieldname1 is an integer the result should be 2 but if fieldname 1 is a decimal the result should be 1
(function(){
if(FLOOR(fieldname1) == fieldname1) return 2;
if(FLOOR(fieldname1) != fieldname1) return 1;

})()
With this same operator, you can separate the decimal part of a number from the whole number and use it in another calculation. For instance, we want to separate .56 from 3.56. This is what the equation will be.
3.56-FLOOR(3.56)This will subtract the integer part of the number from the whole and leave the decimal part which will be 0.56
You might not be so familiar with the equations and the java language but don’t worry, calculated fields form has a very strong customer support team that responds almost immediately. However, to understand the equation more easily it would be good for you to learn about these java operators. If all you need to carry out with the plugin are just simple arithmetic you don’t need to bother yourself with the java operators.
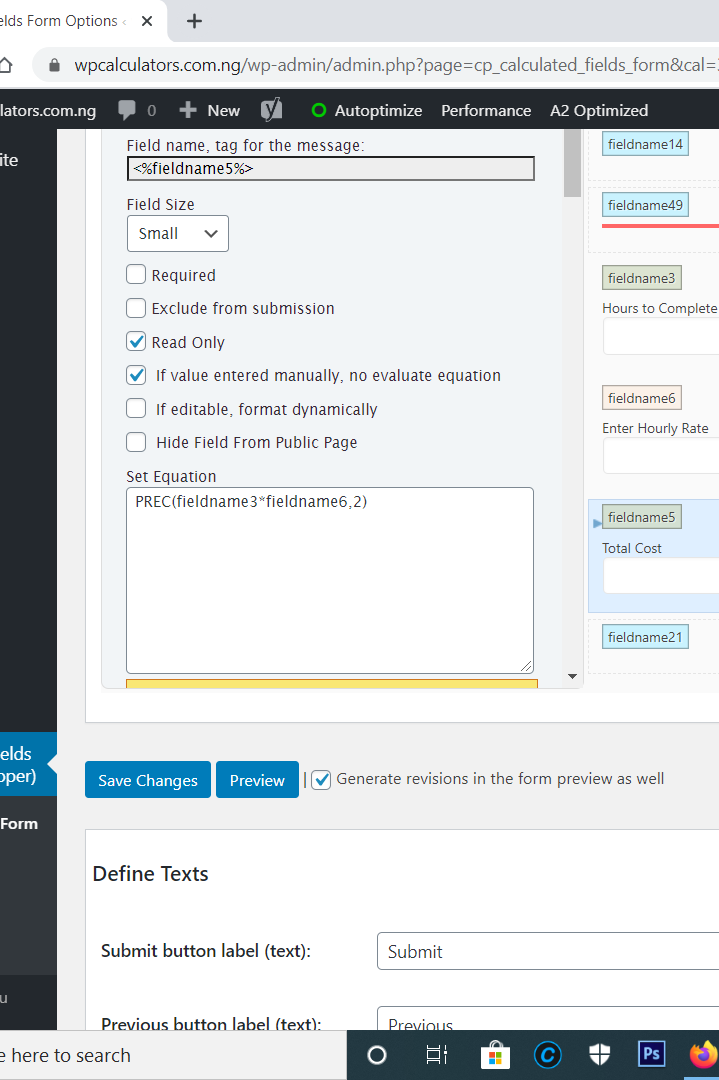
Unlike other plugins, calculated fields forms allow you to round up your numbers to any decimal place you want. Caldera form for instance restricts you to just 2 decimal places. To set a decimal place in calculated fields forms
- type in PREC behind your formula
- open a bracket (
- type in , at the end of the formula
- write how many decimal places you want ‘1’
- close the bracket.
See examples below:
There are several other calculations you could carry out all in the free version. You could carry out calculations on dates without any effort. You can find the difference between two dates, or easily create a life path calculator.
In the life path calculator, the individual digits in a date field are summed up. Let me describe it quickly, if you have a date field ‘fieldname1’ and you want to sum up the individual digits, for example, the date 11-02-1994. You would add a calculated field and input this equation:
eval([...fieldname1|r.replace(/[^\d]/g,'')].join('+'))So this will sum 1+1+0+2+1+9+9+4 =27
Another interesting feature is the concatenate operator. With this operator, you can bring two different results together with a colon. For example, result one = 3, result two = 4 and you want to display the them as 3:4. This is how you do it, let’s assume result one is fieldname1 and result 2 is fieldname2
- Insert a calculated field
- Input this formula
CONCATENATE(fieldname1, ':', fieldname2)and that’s it.
2. Highly Developed and Customizable Fields
Calculated Fields Form has more fields in the free version than any other WordPress Calculator plugin. In fact, all of the fields are available for free. You can check it out yourself. All the labels can be typed in as regular text but at the same time, they can receive HTML codes that would be perfectly outputted. It has the following fields.
- Single Line Text
- Currency
- Number
- Slider
- Date Time (Date & Time)
- Text area
- Checkboxes
- Radio button
- Dropdown
- Upload File
- Password
- Phone field
- Instruc. Text
- Hidden
- Section Break
- Page break
- Summary
- Media
- Button
- HTML Content
- Acceptance (GDPR Compliant)
- Calculated Field
- Fieldset
- Div
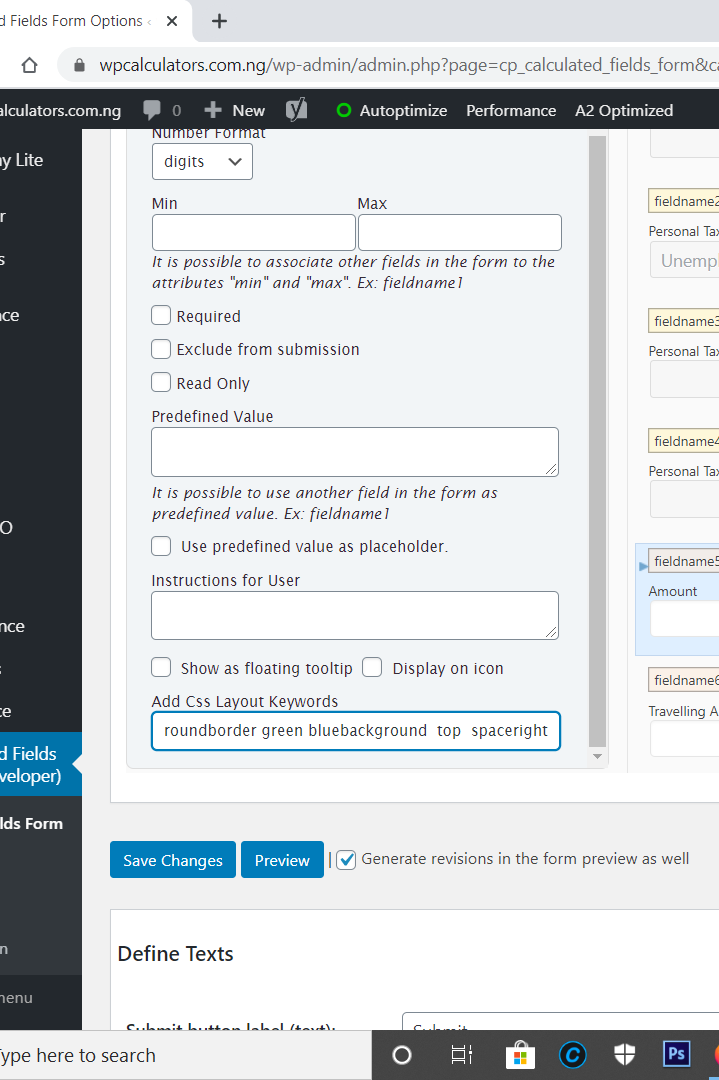
It has 25 fields in all and all of them are available for free. No other plugin has that number of fields in a free version, especially the slider field. I will take the time to describe each of these fields and how they function. Generally, all the fields can have a unique CSS class that you can use to style them. You can as well add the same CSS class to multiple fields to give them the same appearance. Each field can take more than one CSS class, the classes keywords are just separated with space. See an example below. Look under ‘add CSS Layout Keywords’
12 out of the 25 fields can be used for calculations.
Single Line Text
This field allows you to input text characters, but it is not meant for long text unlike text area field. You can use this field for collecting first names, last names or any other thing. This field is meant only for receiving inputs it cannot be used for calculation. To view all the data that are inputted through this field you would need to have the professional version of the calculated fields form. The free version does not allow you to receive submissions.
Field Width
This field has three width size that you can select ‘small’, ‘medium’ or ‘large’. The field label is where you define the name of the field, note that that label space also accepts html codes. So you can have something like:
Name
and it will work perfectly.
Required Checkbox
This makes it compulsory for the user to fill in the field before the form can be submitted. It makes no difference if the form is not meant to be submitted.
Exclude from submission
The second checkbox ‘exclude from submission’, makes sense for those using the paid version, if you don’t want data from this field to be captured in submissions you check the field.
Read only
The last is ‘read only’, this makes the field not editable by users. Whatever default text you place there will remain permanent except you change it.
minimum characters’ and ‘maximum characters
The field allows you to define ‘minimum characters’ and ‘maximum characters’ that are allowed to be inputted in the single-line text.
Validate against a regular expression
Another setting is ‘Validate against a regular expression ‘, this allows you to type in an example of a text that is not allowed. Below it, you will see another space to input the message to be returned when the regular expression fails. The next setting is ‘equal to’. If you have a password field or an email field and you want your users to confirm the password they entered previously, you could create a single line text field and then select the fieldname of the password field in the ‘equal to’ setting. For example, fieldname1 is an email field labelled ’email’. To confirm the email, create a single line text and then under ‘equal to’ select ’email’. So this setting make it for you to confirm inputs, this is not available in other plugins.
Predefined Value
Next setting is ‘Predefined Value’, this is where you input the default text. The predefined value can be used also as a placeholder such that when the single line text field is clicked on the text disappears immediately.
Use predefined value as placeholder
To set the default text as a placeholder, check the ‘ Use predefined value as placeholder.’ box.
Instructions for User
Here, you can input any text that you want to be a form of help to the users. This text will either appear under the field or appear when the help icon is moused over. There are two checkboxes under this setting or you to choose how the help text appears.
Add Css Layout Keywords
This is where you add the CSS class for the single text field. You can add more than one CSS class.
Currency
This field was designed specially for currency calculation. It can both submit inputs and cam be used for calculations. This field has some similar settings with the single line field. I will go through some of the few settings that are different from the ones I discussed earlier.
Min & Max
Here, you set a minimum and a maximum value for the amount that can be entered in this field. You can as well define the value entered into another field especially a number field as the minimum or maximum. For example, let’s assume we have a number field with the question ‘What is your salary?’ and we have another currency field with the question ‘How much are you willing to spend on tourism?’. In this currency field, we want the maximum amount to be inputted not to be more than the amount entered under ‘What is your salary?’ number field. If the salary number field is fieldname2, we will enter ‘fieldname2’ in the ‘max’ box of the currency field.
Currency Symbol
Of course, this is quite straightforward. Just input the currency symbol.
Currency
Different from the ‘currency symbol’ setting, you are supposed to input the three letter currency code here.
Thousands Separator
This is usually a comma but you can define any other symbol that you want. It’s one of the features that are unique to Calculated Fields Form
Format Dynamically to
If you check this box, the symbol you have inputted for separating thousands or cents will be added automatically as users enter a number into the currency field.
two decimal places
This works together with the ‘format dynamically to’ setting. When checked, users inputs are automatically formatted into 2 decimal places.
All other settings are as seen in the Single line text.
Number field
This is one of the most important fields needed for calculations. The number field has 3 different formats, digits forma, number format, percent format.
Number format
This format allows you to type in any integer whether with a decimal number or not. It also allows you to define a ‘Decimals separator symbol (Example is the point in 25.20)’ and a ‘Symbol for grouping thousands (Example is the comma in 3,000,000)’. You also have a check box to ‘Format Dynamically’ so that the symbols you have chosen will be added to the numbers as users type them in. The Min and Max settings works the same way as in the currency field.
Digits format
This is different from number format because it does not accept decimal numbers. It is made for just whole numbers. It also does not need a thousand separator or a symbol for grouping decimals. You may not find it as useful as the number field.
Per cent format
A format almost identical with number field only for two differences. There is a % symbol automatically added to the end of the numbers you input and all the numbers you enter into the field are divided by 100. So this makes your calculation really easy.
Slider
One of the most amazing fields in calculated fields form. This field is like a three in one kind of field. In it’s natural state, it looks like this.
but you can convert it from being just a number input slider to a range slider. See an example below.
The slider is now a ‘range-slider’ with 2 control handles. This is achievable by just checking the ‘range slider’ checkbox in the setting.
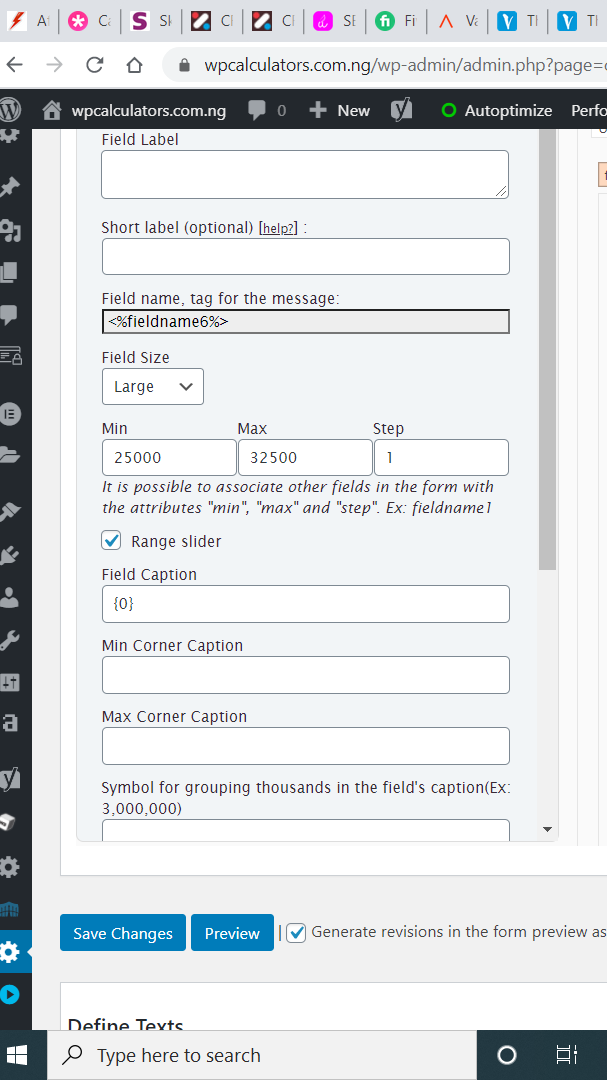
It is also possible to have a kind of number input field that synchronizes with the slider field.
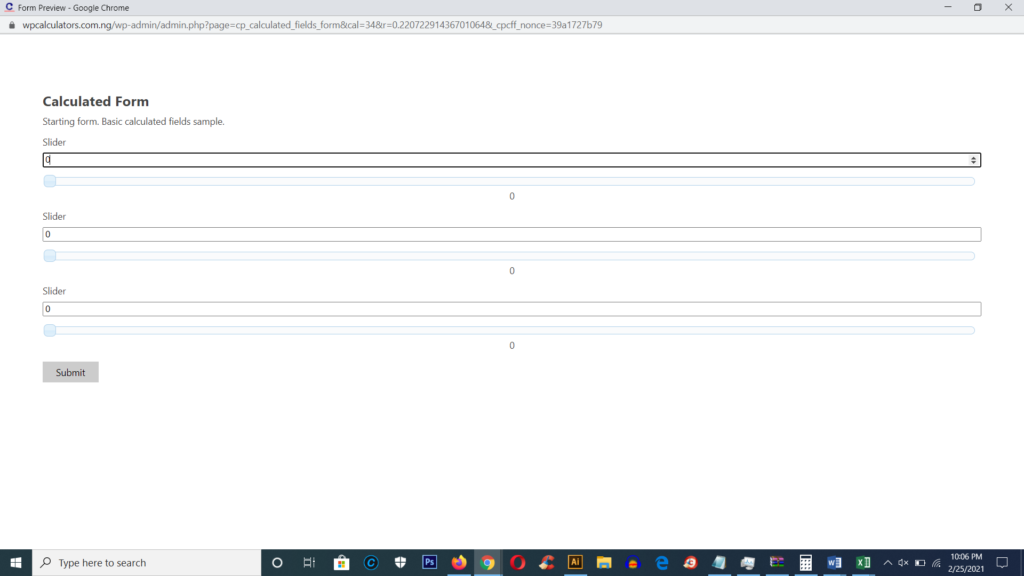
You will notice an input field at the top of the slider. The slider adjusts when a number is inputted into that field and the number also changes when the slider is dialled in. To achieve this, check the ‘Allow to type the values’ box as seen in this screenshot.
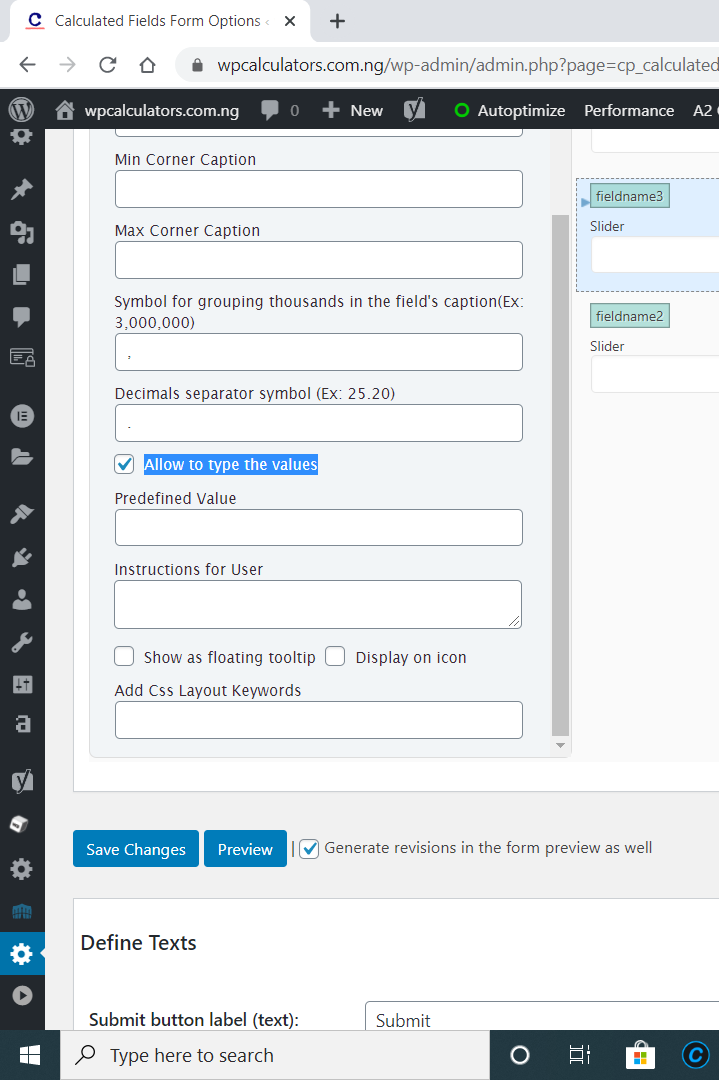
You will notice that the first two screenshots look different from this last one, that is because I added some CSS styles to the first two but this last one does not have any styling. See the CSS code I used for the first two sliders below. First of all in the ‘Add Css Layout Keywords’ setting I input ‘slider’.
.slider-caption {margin-top: -45px;
	text-align: left !important;

	font-weight: 800;
}


.ui-slider .ui-slider-handle {
    position: absolute;
    z-index: 2;
    width: 5px;
    height: 5pxem;
    cursor: default;
	border-radius: 50px;
}

#fbuilder .dfield .slider {

	background: #ff6666;
	border: 0px;
	height: 9px;
		}

.ui-slider-horizontal .ui-slider-range-min {
    left: 0;
	background: #090979
	}
The slider fields shares some settings with the number field but it also has a couple of settings that are unique to it.
Steps
This is where you specify how far you want your slider to move. For instance, if you have a slider with a range of 1 – 50 and you specify ’10’ under steps, the slider will move from 1 to 10, to 20, to 30 to 40 and then 50. If you specify ‘1’ under steps the slider will move from 1 to 2 to 3 and so on. Note that a slider with the ‘range slider box checked enters number in a different way.
Field Caption
Here, you are allowed to insert any word you would like to appear after the number inputted by the slider. For instance if you have a slider with the label ‘How many children do you have?’, you may want the word ‘child(ren)’ to appear after the numbers so it looks like ‘1 child(ren)’, 2 child(ren) and so on. This is where you define the word.
Min Corner & Max Corner Caption
If you want to add a caption at the end of the minimum and maximum possible numbers, this is where you do it. For example, you might have a slider with the label ‘Temperature’, the label for the min corner can be ‘cold’ while that for the max corner caption can be ‘hot’.
Predefined Min & Predefined Max
If you check the ‘range slider’ box, you will see these two settings where you can define a default minimum value and a default maximum value. This is not applicable if the range slider box is not checked.
The email field is similar to the single line text. The only difference is that it naturally validates against regular expressions that do not follow the email format. You can as well use one email field to confirm that the input in another email field is the same, just select the first email field under ‘equal to’. For example, you have the first email field with the label ’email’, you create a second one with the label ‘confirm email’ in the setting of the second one under ‘equal to’ select ’email’ in the dropdown. The form will throw an error message of the email entered in the first field is not the same with that entered in the second field.
Date/Time
The Date/Time field allows you to receive time and date input, only time input or only date input. All the inputs can be used for calculations. By default, only dates selections are enabled but to allow users input time you need to check the ‘include time’ box.
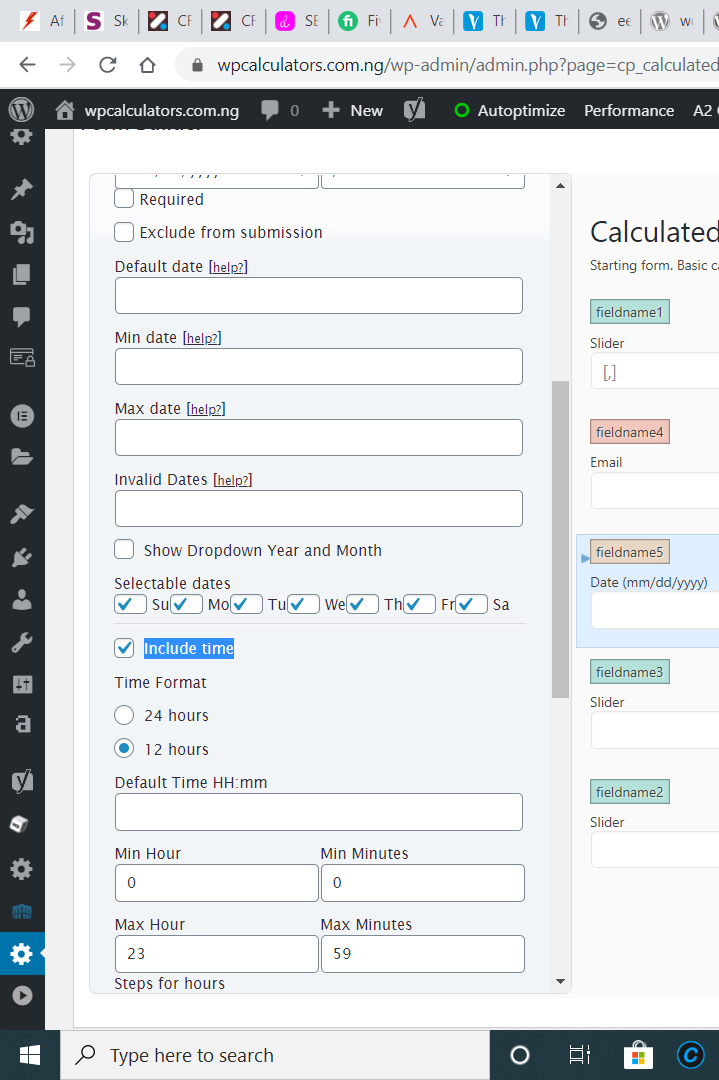
This field is highly customizable. It is very useful for appointment bookings and meetings. It has the following peculiar settings.
Show input field for the date
This enables date input. If peradventure you don’t want dates to be selected just uncheck the box and then make sure the ‘include time’ box is checked so that time can be selected.
Date format
This field has four date formats which are: mm/dd/yyyy, dd/mm/yyyy, yyyy/mm/dd and yyyy/dd/mm
Parts separator
This allows you to select a symbol for seperating the date items. The available seperators are: /. -. and ‘.’
Default date
Here you can select a date you want to appear as default. There are 4 ways you can decide this. The first is to leave it empty, if you leave it empty the current date on which the form is viewed will be selected automatically. The second is to type in a particular date in the same format you have selected in the data format. The third is number of days, for example, if you want the date of 3 days ago from which the form is viewed, you type in ‘-3’, if you want the current date type in ‘1’ and if you want the date of 2 days time, type ‘2’. The last one is to use a string, this is an addition of numbers with ‘y’, ‘m’, ‘w’, or ‘d’. For example, +1m +7d will mean the date of one month and seven days from today will be the default. Selecting the default date can be useful in calculations. You can find the difference in the date a user has selected and the current date in which he/she fills a form by simple subtraction and then use it to determine payment. All you need do is create 2 date fields, the default setting of one will be left empty and the field will be hidden in a div while the other field is where a user will select a date. That is what I used in building this calculator.
Min date & Max date
With this, you can decide what date the field should not go beyond both backward and forward. It’s basically for defining a range. The same parameters for selecting the default date works here. You can also set another number field or slider as a min or max value. For instance, if you have a number field labelled ‘how many days would you like to stay?’ and you want that to determine the ‘max date’ that can be selected from the current date, just input ‘fieldname2’ in the max date assuming that the field labelled ‘how many days….’ is fieldname2.
Invalid dates
Assuming you are a consultant and you want it to be impossible for people to select some certain dates for booking appointment with you, this is where you do it. Just input the impossible dates in the date format you have selected. For example, 02/04/2021, 05/04/2021. You can as well select a range if probably you are going on a holiday for one week, you will have something like 05/04/2021-12/04/2021.
Show Dropdown Year and Month
Checking this box allows the year and month to display as a dropdown in the date picker. Once this is checked you will need to define a ‘year range’. For example -10: +10 meaning 10 years ago from the current year and 10 year to come will be available in the drop down.
Selectable dates
This allows you to chose the days of the week that can be selected and does that cannot be selected. If you open only on Mondays to Friday and you want users to select days of visitation you will just uncheck Saturday and Sunday. The selectable days are the checked ones.
Include time
This activates time selection.
Time Format
Of course, the only two options possible are 12 hours and 24 hours.
Default Time HH:mm
You can define a default time in the format ‘Hour to minute’ in double digits format. If left empty, the current time will be the default.
Min Hour & Max Hour
This is used for restricting the time that can be selected. In 12 hour format the max cannot exceed 12 while in 24 hour format it cannot exceed 23.
Min Minutes & Max Minutes
Same function as the ‘Min hour & Max hour’.
Steps for minutes & Steps for hours
This is where you determine the gap between the numbers, if you want the minutes to increase in 5 steps, the dropdown will appear as 1, 5 10 and so on. Same thing appears to hours. You would almost always leave this number as 1.
Label for hours in screen readers
This should be left as ‘hours’ but if for any creative reason you would like to change the label, you are free to do so.
Label for minutes in screen readers
You can as well change the label for minutes, probably you may want to add a word to the end like ‘minutes biking’.
Label for am/pm component in screen readers
am or pm are always ‘am’ or ‘pm’, what else can it be changed to? 🙂
Predefined Value
This setting affects the date field not the time setting. You can select another field, likely a number field or a slider field whose value should determine the default date.
Text Area
This field is not useful for calculations. It is basically for user inputs. It allows you to define minimum characters that must be typed in and maximum characters that should be typed in. It also has a unique setting of ‘number of rows’ with which you can determine how many row the text area should have.
Checkboxes
This is another important field used for calculation. A checkbox allows you to select more than one item, but you can also restrict the selection to a particular number of items. You can have as many options as you like under each checkbox. Each option has a ‘text’ which is the label and a ‘value’ which is the number used in calculations. For example, if I have a checkbox with the label ‘Select the items to buy’ and the options are ‘one bunch of banana’, ‘one basket of oranges’ and ‘a pear’. The cost of the banana is $20, the oranges $10, and the pear is $5 in the value setting I will input 20, 10 and 5 for each of them so the total cost of the selected items can be calculated in a calculated field. Other settings include:
Merge ticked up options (sum or concatenation) or their values are returned as an array.
This options sums up the values of every item selected on the checkbox. It is useful for calculation. Referring to the example I gave earlier, if ‘one bunch of banana’ and ‘a pear’ is selected, the total value this field will return will be 15. You will always want to leave this setting checked especially if you are using it for a calculation.
Field Layout
Unlike other fields, the check box options can either be arranged in one column, two column, three column or side by side.
Value to Submit
This is useful only if you are receiving submissions which is possible with the professional version of the plugin. With this setting you choose what data should be stored, either the option’s label (text) or the option’s value.
Maximum number of choices to be ticked.
How many checkboxes do you want to be selectable? This is where you define the answer. Going back to my example, each user might be allowed to buy just 2 fruits out of either banana, oranges or a pear. So in this case the maximum number of choices will be 2.
Check no more than {0} boxes
You can determine the error message that should be displayed when a user selects more than the acceptable number of options.
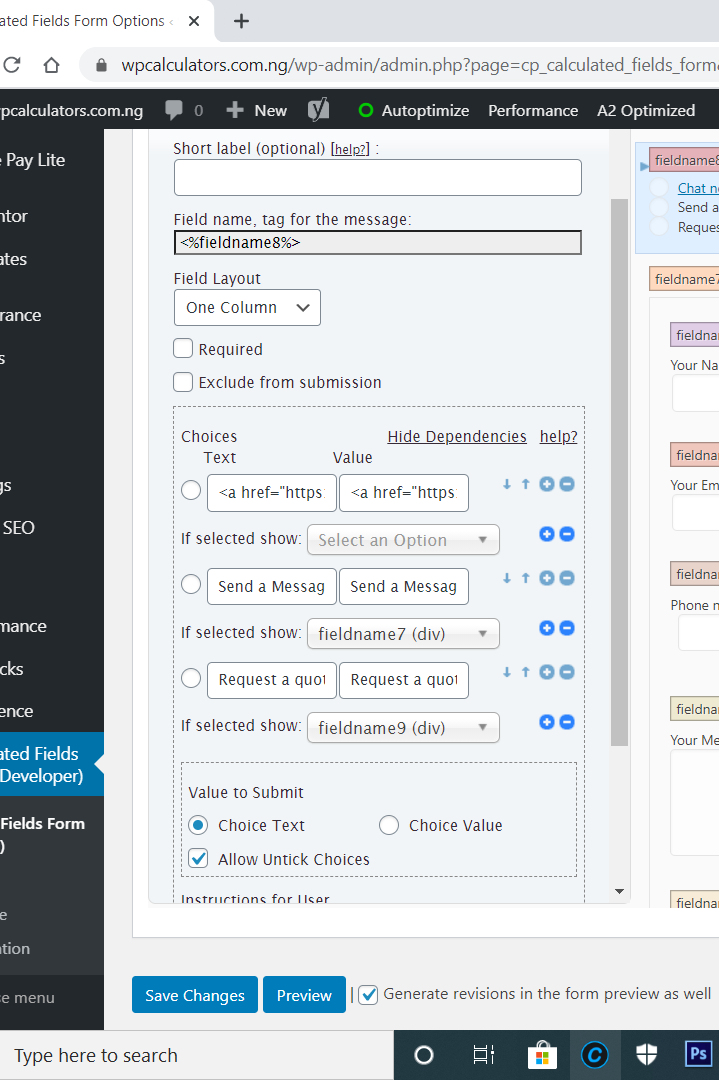
Show Dependencies
This link activates the dependency function of the checkbox. The dependency function allows you to select any other field in the form that will appear only when one of the options in the checkbox is selected. Each checkbox option can have multiple fields depended on it. Using our old fruits example, you can have a number input that appears when ‘a bunch of banana’ is selected. The number field can be the quantity of bunches that you want, you can also have another dropdown field depending on the same option such that users can choose their shipping location. So the checkbox will look somehow like this.
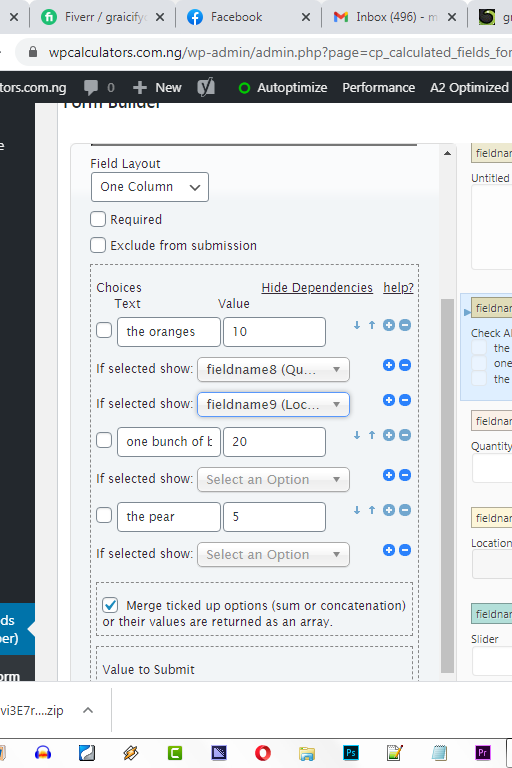
Default check
It is possible for you to have one or two options in the checkbox automatically checked. To do that you just need to check the square box beside the options like this:
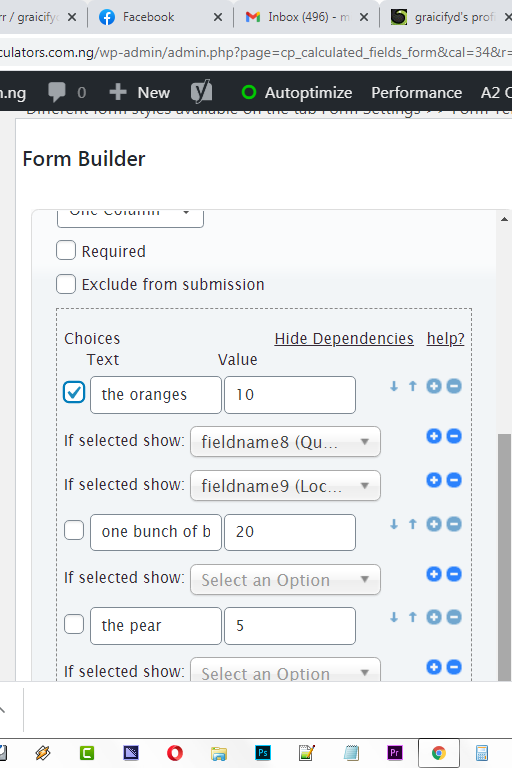
In this example, option of ‘the oranges’ is checked automatically but it can be unchecked by the users on the front end.
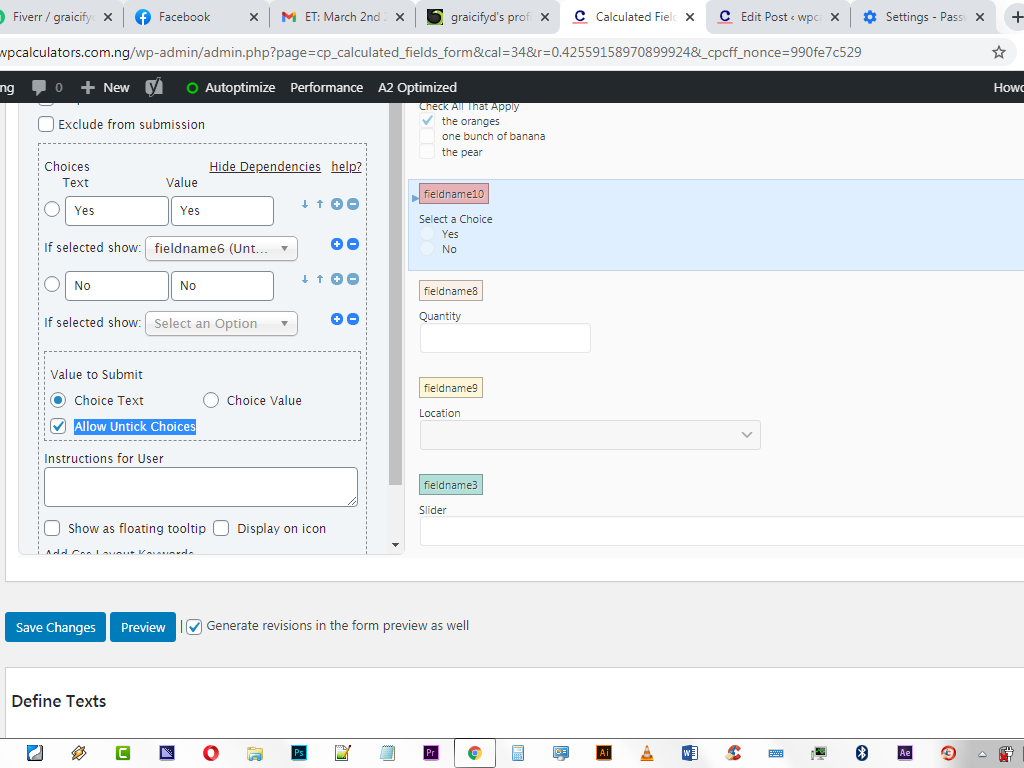
Radio buttons in calculated fields forms have similar settings with checkboxes, the major difference is that the radio button does not allow you to select more than one options. The dependency function in the checkbox works in the same way with the radio button. The radio button can be used to hide and reveal other fields, for example, if we have a radio button with two options ‘yes’ and ‘no’ and we want a dropdown to show if the ‘yes’ option is shown and then hidden if ‘no’ is selected, we just need the dropdown field to be a dependant on the ‘yes’ option. When ‘no’ is selected, the dropdown will be automatically hidden. This option works in all versions of the plugin.
Default selection
There is a round checkbox beside the options in a radio button, checking it will make that a default selection.
Allow Untick Choices
You can either allow users to change their selections or make it impossible to choose another option after they check a particular radio option.
One amazing thing you can achieve with the radio button is a switch button. Calculated fields form does not have a ‘switch field’ by default but you easily create one with some CSS codes. That is what I did in this calculator to achieve the metric and imperial switch. I simply added the CSS keyword ‘switch’ to the radio button and added the following CSS to the form settings.
.switch .dfield input:checked+span {
    background: #f66;
    color: #fff;
}
.switch label span {
    background-color: #fff;
    color: #090979;
    font-size: 14px;
    line-height: 1;
    text-align: center;
    padding: 8px 16px;
    margin-right: 0;
    border: 2px solid #f66;
    border-radius: 0;
    padding-left: 25px;
    padding-right: 25px;
    height: 39.6px !important;
}
I used similar styling for this too
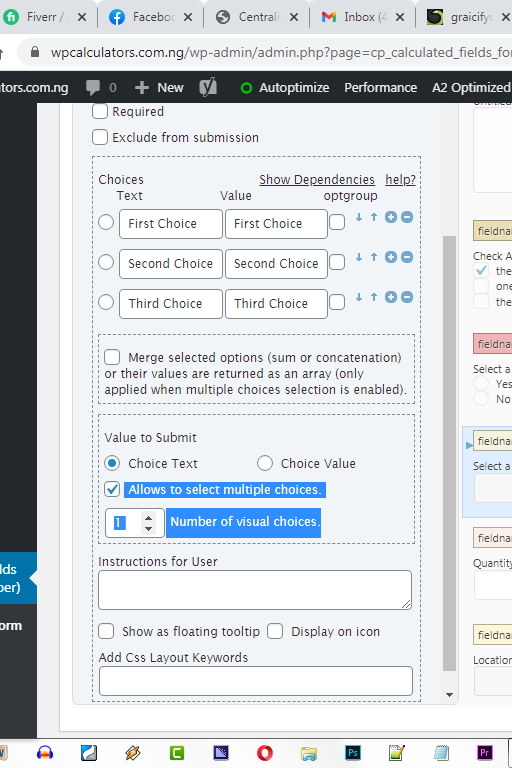
Dropdown
The dropdown works in a similar way the radio button and the checkbox. The unique thing about Calculated fields form dropdown is the fact down you can select more than one option in a drop down. All you need do is to check the ‘Allows to select multiple choices’ box. You may also need to type in ‘Number of visual choices’, that is, how many options should be displayed as selected.
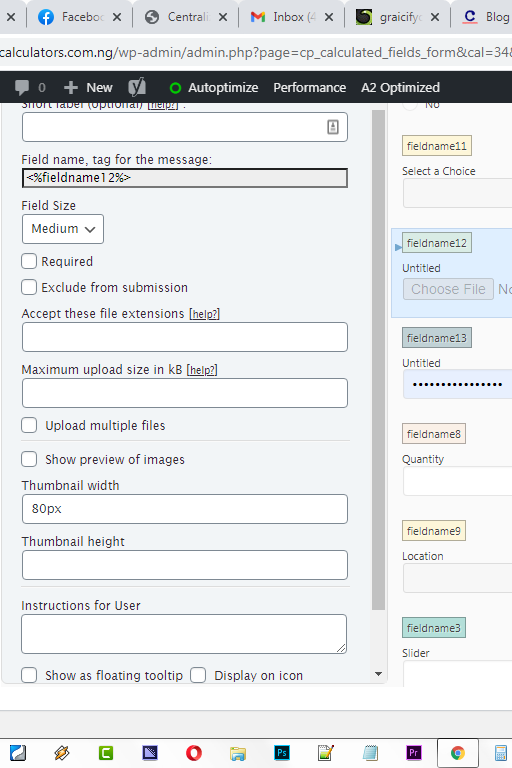
Upload files
This field will be very useful to you if you want your users to submit any kind of files on your site. Of course, it means that you would have to use the professional version of the calculated Fields form. The field is very versatile, you can define any kind of file extension you want your users to be able to upload. If you want to receive images, for instance, you can type in jpg,png in the ‘Accept these file extensions’ box. Type in all the extensions you want without space just separated by commas. You can as well define the maximum file size in kilobytes. It is also possible for users to upload more than one file once you check the ‘Upload multiple files’ box. If you are accepting images and you want the preview to be shown, check the ‘ Show preview of images’ box. For that, you can as well define the width and height of the preview image. This is the most customizable ‘upload file’ field that exists in any WordPress Calculator plugin.
Password
This field is like the single line text’ field only that it has a different appearance in which your inputs are concealed by default. Of course, that is a regular thing with password fields.
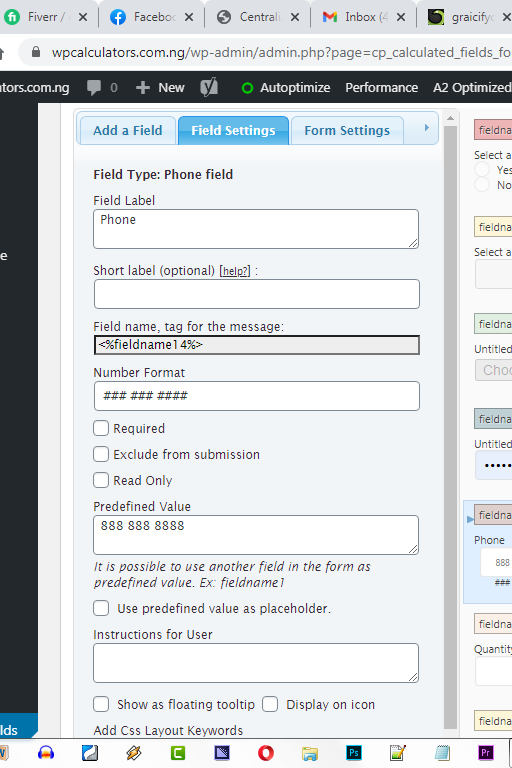
Phone
The phone field has similar settings with the number fields. The unique feature it has is that you can specify the format in which you want numbers to be entered by using a group of #. For example if you want numbers to appear this wasy 070-111-222-33, the hash will look like this ### ### ### ##. Still with the hashes you can define the minimum and maximum number of digits that should be inputted.
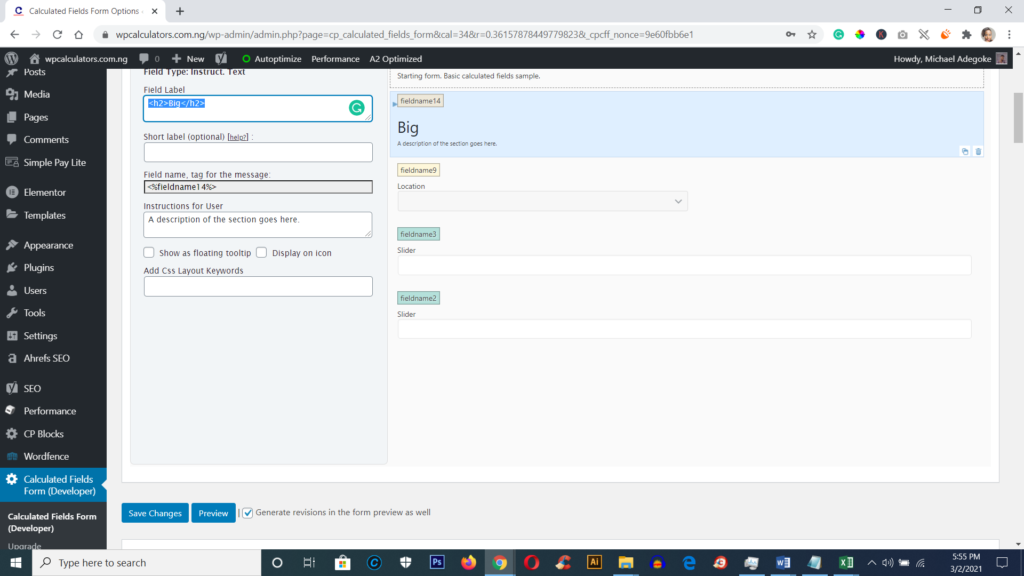
Instruct. Text
This is a field you can use to add text to your calculated fields forms. It can take html tags like h1, h2 etc. If you want the text you are adding to appear big and bold you could use a h2 tag like this <h2>Big Tex</h2>
Hidden
This field is basically for calculations. You can use it to define a value that you want to make visible to users. It’s simple a number you define that is hidden that you intend to use for calculations or to use in an HTML field. For instance you want to add $200 to every price calculated in a form, you can just create a ‘hidden’ field, define the value as ‘200’ and then use it in your calculations. The field is not visible on the front end that is why it is called ‘hidden’.
Section break
This is just a horizontal line that helps you divide the form into parts. It also allows you write some text that woul probably describe the other part you are separating. This field also takes a CSS keyword meaning that you can style it with CSS codes.
Page break
This is so exciting. Calculated Fields Form is naturally multipage, you don’t need to do any extra coding to achieve that. In fact, it has all the buttons you would in a multipage form /next, back, submit’ by default. To create a new page, all you need to do is to add a ‘page break’ field and a new page will be created automatically. Every content that comes after a page break will be on a new page. So the more page breaks you add, the more pages you have. This field does not have any setting.
Summary
This field allows you to show the values of other fields including the selections that were made. So you can select as many fields as you want whose summary you want to be displayed.
Media
Media field allows you to upload either a video, image or an audio file to be embedded into your calculator. This can also be achieved with the HTML field, but the default media field makes it easy for people that are not familiar with HTML codes.
Button
This is one of the most important fields. Calculated fields form naturally does not have buttons because the calculations are done as you make the inputs. This setting can, however, be changed. It is possible for the calculations to be done only when the ‘calculate button is clicked on like what you have in this calculator. What you need is a button field and some other settings. The button field has three formats, ‘calculate’, ‘reset’ and ‘button’.
If you want the button to function as a trigger for calculations to be done, you will check the ‘calculate’ box in the settings like this:
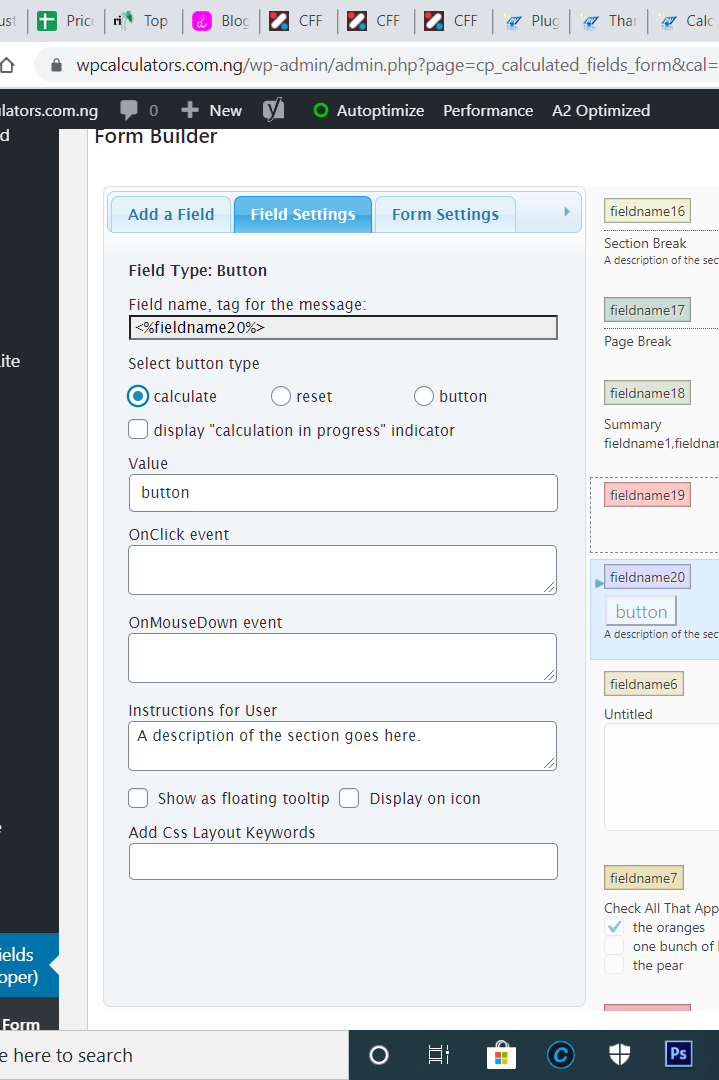
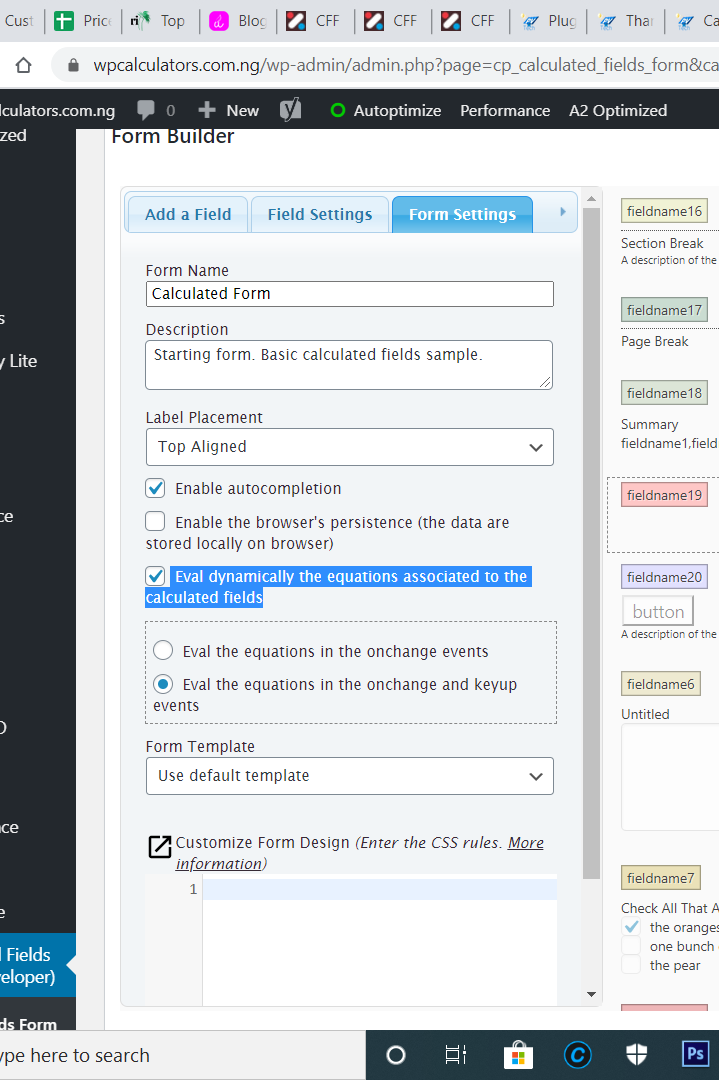
after that, go to form settings and uncheck the ‘ Eval dynamically the equations associated to the calculated fields’ box. Once done, the calculations will not be done until you click on the calculate button.
When you choose the ‘calculate’ format, you will also see another checkbox that allows you to display a “calculation in progress” indicator.
The value input of the button is like the ‘label’ of other fields, so you can change the ‘button’ text to whatever you want, for instance, ‘calculate’.
The next format is ‘reset’. This option clears of the calculation that has been done already. So if you want your users to reset whatever they have inputted you just need to add a button field and then choose ‘reset’ as the format. The last format is ‘button’. This has a lot of functions. The calculator by default has a submit button which is enabled if you are using the professional version of the plugin, but it is at the very end of the form. If you want the button to appear at a different position, you can create yours manually with the button field. Add a button field, then in the onclick event input add this code:
jQuery(this.form).submit();You can also create a next button with the same process, use this code for the onclick event:
jQuery('.pbNext', '.pbreak:visible').click();and in addition to that, you will need to hide the default next button with this code.
#fbuilder .pbNext{display:none !important;}Add the code to the form settings.
For ‘back’ or previous use this code for the CSS
#fbuilder .pbPrevious{display:none !important;}and for the form setting use:
jQuery('.pbPrevious', '.pbreak:visible').click();Another thing you can achieve with the button field is to redirect users to a link after they are done using your calculator. Add a button field and add the code below as the onclick event.
redirectToURL('https://www.yourwebsite.com/page');If you understand jquery you can create your own events by yourself. You could have events for scrolls, animations and so on.
HTML Content
This field can be used to add scripts and then add any form of HTML content. You can create a table with HTML and use this field to add it into the calculator. You could insert calculation results into the table using jquery. You can use the HTML content to display the content of another calculated field.
Add an HTML field, for instance:
The result is <span class="value-a"></span> and <span class="value-b"></span>Assuming that, you already have 2 calculated fields ‘fieldname11 and fieldname72 and you want their results wrapped in the HTML field above, create a calculated field and insert the following code into it:
(function(){
jQuery('.value-a').html(fieldname11|r);
jQuery('.value-b').html(fieldname72|r);
})()
This was the process used in creating the table in this calculator and also in this Reversed BMI calculator.
You can also use this field to ad images, videos or any other kind of content that you have.
Acceptance GDPR
This field is used to make your users accept your terms and conditions. You can either enter the texts in the input space or put a link to your terms and conditions page. This field helps you to be GDPR compliant.
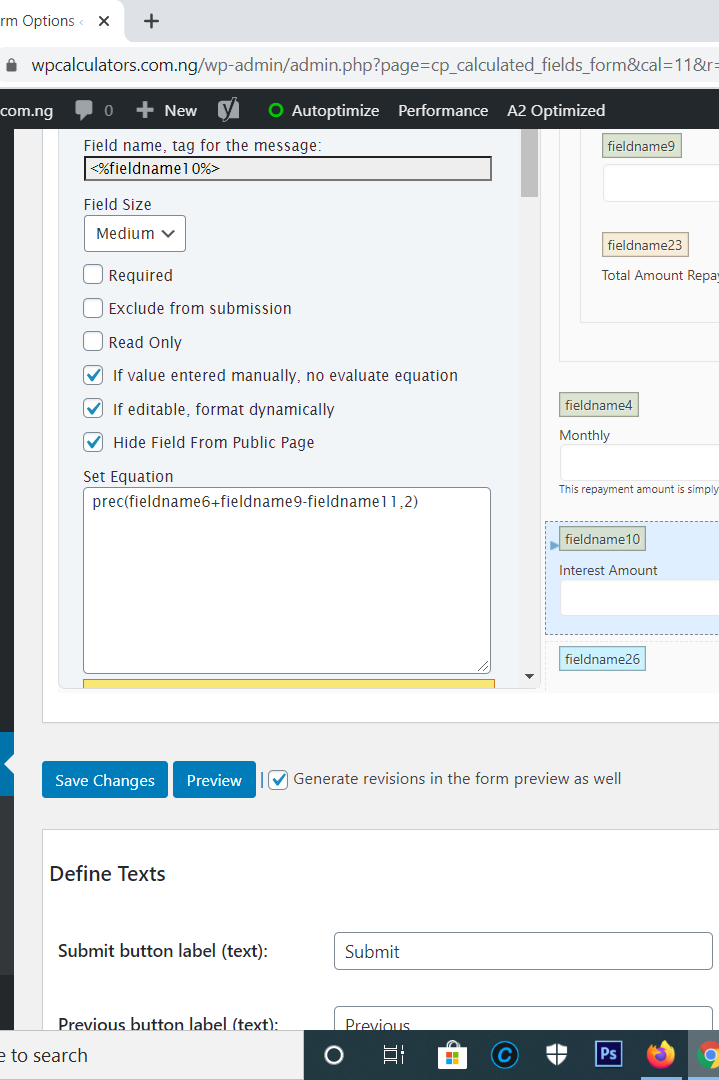
Calculated Field
This is the most important field for calculation. It’s in this field you input all your formulas and define how every other calculation field relates. It has various operators you can make use of. This field can also be hidden from the public page. This field is the actual reason why the plugin is called ‘calculated fields form’.
Read Only
The field is be default set to ‘read only’ since it’s a result of other fields but there are rare conditions where you would want it to be editable. You can uncheck the ‘read only’ box and it will become editable.
If value entered manually, no evaluate equation
If checked, the calculations of the form will not change even if a number is manually typed into the calculated field.
If editable, format dynamically
If checked, commas or symbols that have been defined for formatting the numbers in the field will be added automatically as the numbers are being inputted into the field.
Hide Field From Public Page
Checking this box makes the calculated field invisible on the front end. You can use it to make auxiliary calculations that you do not want to appear to your users.
Symbol to display at beginning of calculated field
This is where you can input a symbol which could be a currency or even a word.
Symbol to display at the end of calculated field
same thing with the previous item only that this one is displayed at the end of the field.
Define dependencies
With this function you can make the display of every other field in the calculator conditionally dependent on the result of a calculated field. If for example, we have 3 fields a slider, an email input and a radio bullet input. Assuming that there is a number input where users are allowed to type in any number they want, we want the slider field to display only when a number less than 5 is entered. To achieve that, we will create a calculated field and then under ‘define dependencies’ we will choose ‘if value is’ less than or equal to 5′. Under ‘If rule is valid show: ‘ we will choose the slider fieldname. Other conditions available in the function are :
- equal to
- Not equal to
- Greater than
- Greater than or equal to
- Less than
- Less than or equal to
This field can be hidden from the public view and yet it will work perfectly.
Div Field
A dive field is meant for organizing other fields into columns.
Fieldset
A fieldset is basically a container that has visible border lines and a label. The only difference between it and a div field is the border line it has. A fieldset is used to arrange other fields into columns, it can also be used to group items such that a CSS keyword can apply to all the items in it. Everything that applies to a Div field also applies to a fieldset.
Customer support
This plugin has the best customer support of any WordPress plugin I have seen so far. They respond to every query in less than 6 hours sometimes almost immediately. To confirm this, you can check the reviews they have and you can as well check the number of questions they have answered each month. They are no just fast in responding, they are efficient with highly skilled programmers. In my over 10 years of using WordPress I have not found any plugin with a better customer support.
Spam Control (Avoid spam without Recaptcha)
This plugin is not just good for calculation, it is a perfect contact form plugin that can be used to reduce spam to 0% without recaptcha. Yes 0%, I am talking about what I have personally experienced on this site and on y other sites. I don’t get any spam message. How do I achieve that, it is simple. First of all, check my contact page. I used a professional version of the plugin which allows inputs submission. I made the submission button conditional, such that it does not appear until a question is answered. The question was not generated by Recaptcha no I generated it. The answer is meant to be slid and it will require the user to slide 3 times after which the submit button will be displayed, then the form can be submitted. If the right answer is not submitted the submit button does not display. This is how I avoid spam. No bot can crack this system, yet the plugin is bought once and for all no monthly subscription.
Tables and Columns
This plugin has the most flexible settings for columns and tables. You can either use the inbuilt column settings or use CSS keywords provided in the plugin’s documentation.
Easy to use Templates
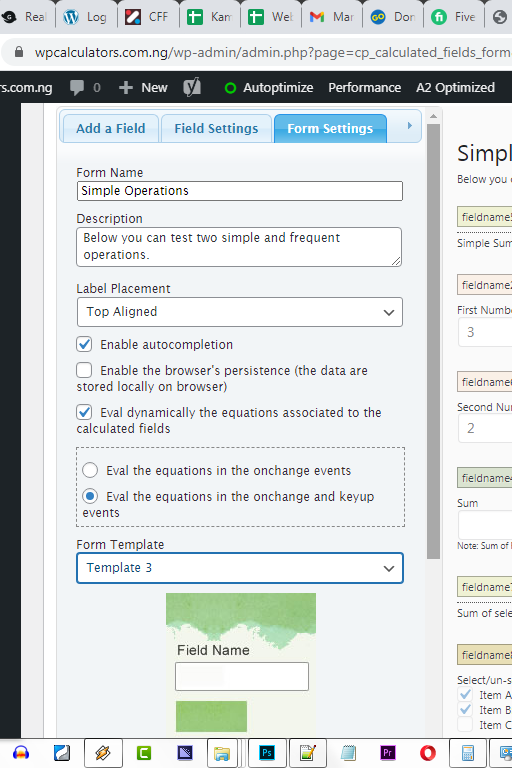
ON installation, the plugin comes with 5 pre-made calculators. They include Simple operations, Calculations with Dates, Ideal Weight Calculator, Pregnancy calculator and Lease Calculator. In terms of the look and feel the plugin has 12 templates from which you can choose.
To access the templates go to ‘form settings’ under ‘form template’ chooseany one you want and see how it looks.
Form revision generation
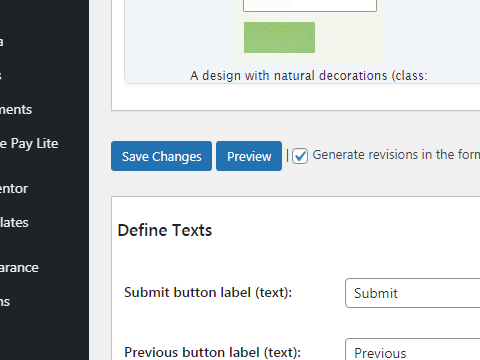
One amazing thing I like about this calculator is that you cannot make an irreversible mistake. The form generates a revision every time you save an edit so you can always go back to a previous edit even till the very first time you published the form. The ‘Generate revisions in the form preview as well’ checkbox is checked by default.
Compatibility with Speed Optimizations Plugins
This plugin is compatible with WP Rocket, Autoptimize and other Speed optimization plugins. It has a dedicated setting to cater for them.
Best Setting for Autoptimize
- In the settings page of the “Calculated Fields Form” plugin, select the option: “Classic (Recommended)”, for the attribute: “Script load method:”.
- Now, in the settings of the “Autoptimize” plugin, press the button: “Show advanced settings”, and enter the files names: jquery.js,jquery.validate.js, in the attribute: “Exclude scripts from Autoptimize:”.
- Finally, press the “Save Changes and Empty Cache” button.
Another solution:
- Go to the Autoptimize settings through the menu option: “Settings/Autoptimize”
- Press the “Show advanced settings” button.
- Tick the checkbox: “Also aggregate inline JS?”
- Finally, press the button: “Save Changes and Empty Cache”
For other settings, check the plugins faq.
Support for Payment Gateways
The platinum version of the plugin supports various payment gateways which include:
- PayPal Pro
- Authorize.Net
- Skrill
- TargetPay (iDeal)
- Mollie (iDeal)
- RedSys
- PayTM
- SagePay
- Sage Payment
The professional version supports only Paypal.
Integrates with Woocommerce
The Developer and Platinum version allows you to integrate calculators with your WooCommerce products. The price of the product can be calculated at runtime, with all facilities, fields, and mathematical operations of the “Calculated Fields Form”, and preserves the strengths and features of WooCommerce, as multiple payment gateways, shopping cart, orders, and more.
Coupon/Discount Codes
The plugin allows you to use discount codes either on Woocommerce products or regular payment forms. The function works in the professional version upwards.
Built-in Captcha
This plugin has a built in captcha system . It saves you some site speed, instead of relying on Google captcha. (premium function)
60 Days’ Technical Support
If you purchase any of the premium versions of the plugins you get 60 days of free technical support.
Form/Field Duplication
It is very easy to clone a calculated form. On the Professional version, you can import and export forms from one site to the other. You can as well duplicate fields on all versions of the plugin.